
I started with this photo from a church in West Virginia.

I downloaded the photo into my computer and with the help of photo editing, I changed the image into a black and white pen and ink drawing. Then I tinted the image with various colors of blues and pinks. I printed the photo onto cardstock. Finally I cut out the window panes of the printed image with scissors.

Next, I scanned into my computer, a photo I had taken of the sky. I edited it some to enhance the colors. Then I printed the photo the same size as the window. I cut a transparency sheet the same dimensions as the photo and the black and white tinted window. I put the transparency sheet behind theblack and white tinted window to see where to place a stamped image of the nativity. I stamped the image on the transparency using an embossing stamp pad. Next, I put on black embossing powder, shook off the excess, and heated with a heat gun.

Behind the transparency, I placed the sky photo and voila.

After painting and stamping texture into the black and white tinted photo, I placed it over the stamped transparency, and photo image.

 I started with this photo from a church in West Virginia.
 I downloaded the photo into my computer and with the help of photo editing, I changed the image into a black and white pen and ink drawing. Then I tinted the image with various colors of blues and pinks. I printed the photo onto cardstock. Finally I cut out the window panes of the printed image with scissors.
 Next, I scanned into my computer, a photo I had taken of the sky. I edited it some to enhance the colors. Then I printed the photo the same size as the window. I cut a transparency sheet the same dimensions as the photo and the black and white tinted window. I put the transparency sheet behind theblack and white tinted window to see where to place a stamped image of the nativity. I stamped the image on the transparency using an embossing stamp pad. Next, I put on black embossing powder, shook off the excess, and heated with a heat gun.
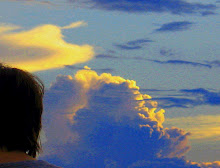
 Behind the transparency, I placed the sky photo and voila.
 After painting and stamping texture into the black and white tinted photo, I placed it over the stamped transparency, and photo image.


2 comments:
Is this picture from our bike ride in downtown Charleston this summer?
This is really cool overlaying.
Yes, I love that church window. Thanks for the compliment.
Post a Comment